Soft Overlay: A Better Replacement for Soft Light and Overlay
The Best Blend Mode for Dodge & Burn
It seems I’ve found the best blend mode for dodge & burn. And it’s neither Soft Light nor Overlay.
Dodge & Burn is the main tool in every retoucher’s arsenal. This technique allows you to locally lighten or darken specific areas of a photograph, creating volume, emphasis, and fixing defects. Essentially, we’re imitating what a photographer could do during a shoot with additional lighting—if they had an infinite number of light sources, time, and patience.
Technically, Dodge & Burn can be implemented in different ways: Dodge Tool and Burn Tool, curves, adjustment layers. But the most convenient way is to use a contrast adjustment layer with Soft Light (more often) or Overlay (less often), because retouching is performed in a single layer.
What should an ideal blend mode for dodge & burn be? In short, it should simulate changing the brightness of individual parts of the scene. Or exposure. Sounds simple. But Photoshop doesn’t have such a blend mode.
Let’s just look at how the usual dodge & burn tools work and check how close they are to changing exposure.
Overlay
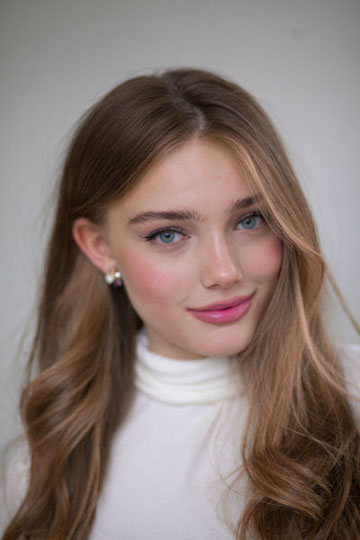

On the left—conversion with correct exposure, on the right—conversion with -1EV exposure and lightening in Photoshop using Overlay. Noticeable shifts in hue and saturation are visible.

On the left—conversion with -1EV exposure. On the right—conversion with correct exposure and darkening in Photoshop using Overlay. We won’t do this anymore.
Soft Light
Soft Light acts more carefully and is the “default” choice.
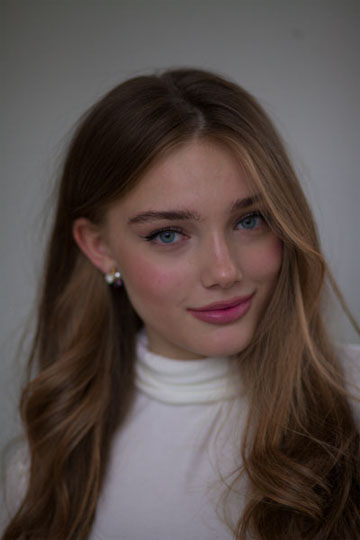
On the left—conversion with correct exposure, on the right—conversion with -1EV exposure and lightening in Photoshop using Soft Light. Significant loss of saturation, contrast, and detail in highlights is visible.

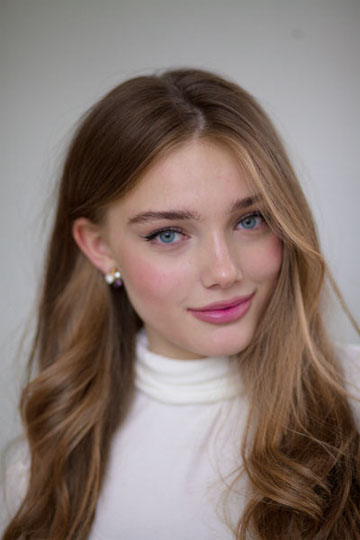
On the left—conversion with -1EV exposure. On the right—conversion with correct exposure and darkening in Photoshop using Soft Light. Strong increases in contrast and saturation are visible. This might be a plus in some cases, but our goal is to simulate exposure.
Soft Overlay
So, neither Overlay nor Soft Light gives us what we need—natural changes in brightness. Here we must accept the imperfection of the tools and simply choose the most appropriate one for the situation. Or use curves or Brightness/Contrast for lightening and darkening, constantly switching between layers.
But look at the following examples:
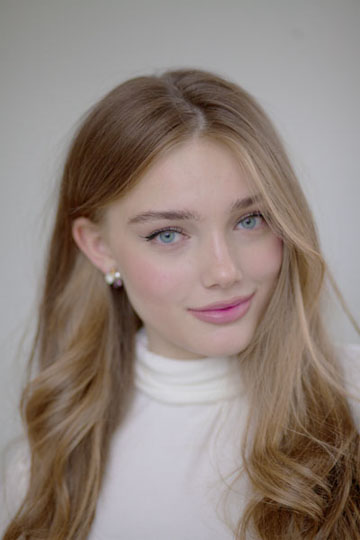
On the left—conversion with correct exposure, on the right—conversion with -1EV exposure and lightening in Photoshop using Soft Overlay. A worthy result.

On the left—conversion with -1EV exposure. On the right—conversion with correct exposure and darkening in Photoshop using Soft Overlay. These are indeed two different images; I checked.
This seems to be what we need! This “blend mode” is called Soft Overlay. It’s not among the standard blend modes, but all the necessary ingredients for its creation have existed for 30 years.
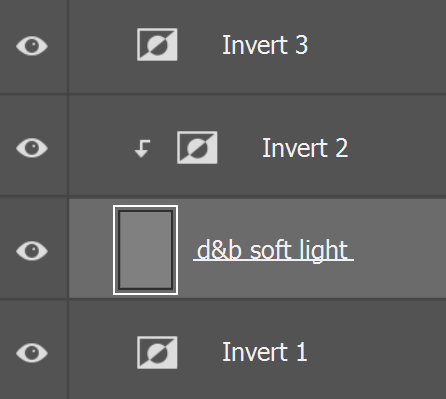
Soft Overlay is created as follows:
- Create an Invert adjustment layer.
- Create a raster layer filled with gray. Apply Soft Light blend mode. Dodge & burn will be performed on this layer.
- Create an Invert adjustment layer and apply it in Clipping Mask mode to the previous raster layer.
- Create an Invert adjustment layer.
Adobe, thank you for the most useless Invert adjustment layer! Who would have thought that by applying it three times, we would get something truly useful.
You should end up with a layer structure like this:
Let’s list the advantages of Soft Overlay and explain why it works this way.
Advantages:
- One raster layer. No masks.
- Preservation of the black point.
- Preservation of the white point.
- Better simulation of exposure changes (starred item). The result is as close as possible to what would happen if the photographer changed the lighting or exposure during shooting.
- Minimal shifts in hue and saturation. Skin remains skin.
Why does this work? We won’t delve into technical aspects and will limit ourselves to the following image:
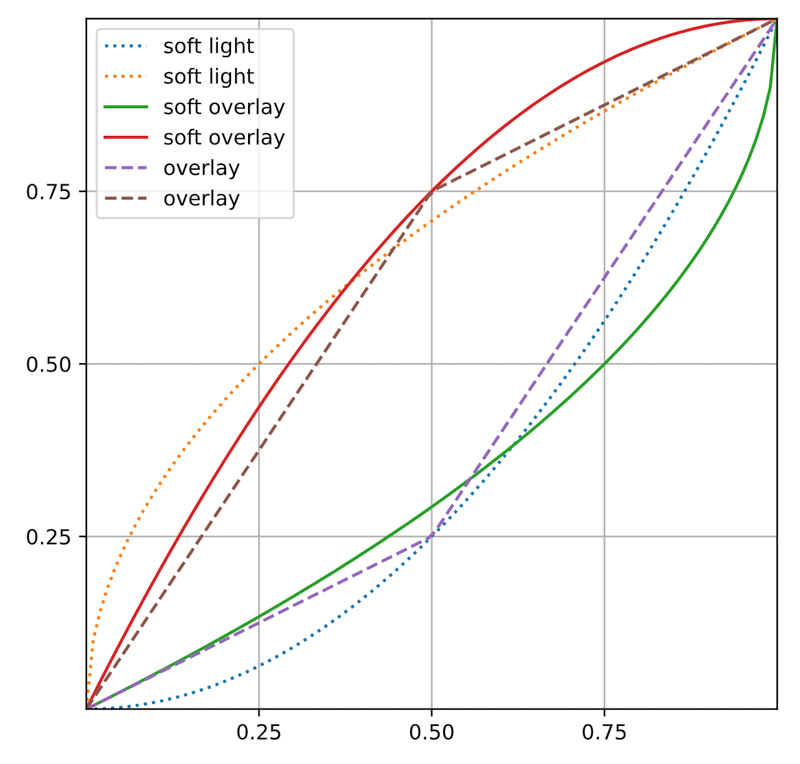
The Soft Overlay mode is something between Soft Light and Overlay. From Soft Light, it took softness. From Overlay—careful treatment of shadows. And on its own, it added adequate correction of highlights.
In more technical terms, Soft Overlay is a combination of Color Dodge and Multiply with a fixed white point.
There is one disadvantage. The effect might not be strong enough. But in this case, you can create another raster layer with an inverting layer.